Whether you are printing an important document or a memorable photo, maintaining a higher-quality print is important. However, not every printout requires high-quality printing. Considering this, you can change print settings on HP printer on Windows and determine what kind of paper quality, ink levels, speed, etc., you require.
In this guide, you will learn how to change print settings on HP printer for Windows using the different functions and settings your printer model offers.
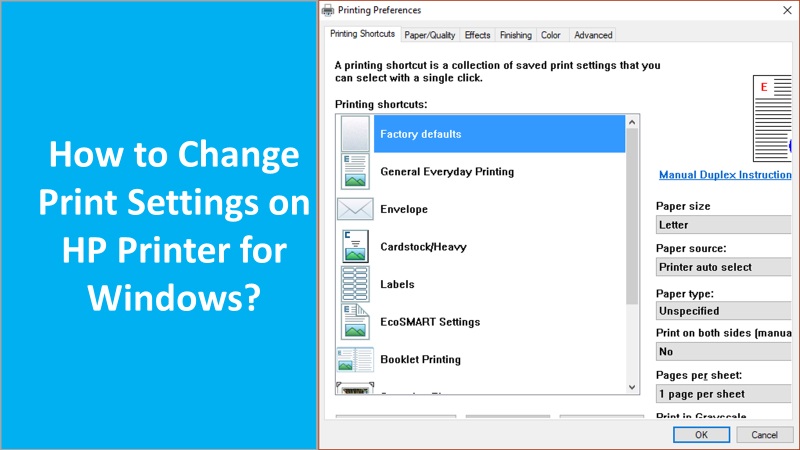
Locate the print settings on HP printer for Windows
Printing settings can be found in the same app from which you are sending print jobs. When you open your document, go to the File menu and send the document for print.
Thereafter, you can select the relevant option (depending on the app you are using) to access and change print settings on HP printer for Windows.
- Access any document, webpage, or photo.
- Then, click on the File menu.
- Press the Print button or select the Print icon. This will bring up the Print window.
- Now, open the options for printing. Note that the line or button name may vary. It depends on the app from which you are performing print operations. The following instructions will clear your ideas:
- Windows 10 Photos App: Select the More Settings option from the bottom of your settings list.
- Microsoft Word: Select the Printer Properties option.
- Paint & WordPad: Click the Preferences option.
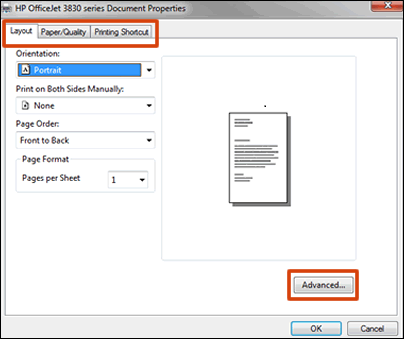
- Now, select the tabs from the top of the window. Alternatively, you can click the Advanced button. This will allow you to access settings for the printer.
Change or edit color and black & white print settings for HP printer
In an HP printer, you can also determine how your printer machine should interpret the colors and use the ink for printing. Before you change print settings on HP printer for Windows, edit the documents or photos ( for good results) in the app in which you created them.
Color or black & white
- Go to the Advanced tab or select the Paper/Quality, Color, Features option to select settings.
- Here, you will see the following settings and options:
- Color
- Black and White, Monochrome, Black Ink Only, or Grayscale
- Hi Quality Grayscale
- Print all texts in black
Color management
- Select the Advanced or Color tab to access the Color Management settings.
- From here, you can determine the range of the colors printed based on the app you are sending prints from or the industry color standards. You can work on the following options to manage the colors for printing:
- ColorSmart/sRGB
- AdobeRGB
- ICM is handled by the printer or host system, ICM is disabled, or managed by the app.
Advanced color settings
- Navigate to the Color tab.
- From this tab, you can adjust the brightness, tone, and saturation. You can also modify the individual color levels.
Paper type, size, & input tray settings on Windows
Paper type, size, & input tray settings enable your HP printer to handle and scale the print job properly to the paper. To set such paper settings, you can access the Features or Paper/Quality tab.
Please note that when you load papers into the input tray, wait for the prompt on the printer control panel menu to confirm the paper type and paper size.
Type of paper
- Select the paper type that you are using. It could be plain paper, HP photo paper, or custom media.
- You can also select the Automatic button. This will let your printer machine choose the appropriate paper type.
Paper size
- Choose a paper size that you loaded in the HP printer. The paper size could be 8.5 x 11 plain paper, 4 x 6, or legal.
- Make sure you check the specifications of your printer for the supported paper sizes.
Paper tray or source
- If your HP printer has more than one tray, select the one into which you have loaded the papers.
- Alternatively, you can use the Automatically Select option. This will pull papers from the main tray.
- In case your main tray is empty, the printer will automatically pull the paper from another tray (that contains papers).
Change print quality and improvement settings for HP printer
You can also change the print quality settings on the HP printer that suit your print job. Most documents with only text require lower or normal print quality settings. On the other hand, the photo document requires high-quality settings.
Print Quality
- To give the best quality of printouts, you can adjust the print resolution. Remember the print resolution is measured in DPI (dots per inch). The higher the DPI is, the more detailed prints it provides. However, the speed can be low and might use more toner or ink.
- You can modify this print quality from the Advanced Options, or the Printing Shortcut tabs, Advanced, or Paper/Quality.
- Here, you will see the following settings and options:
- Draft
- EconoMode
- FastDraft
- FastRes
- Normal or Everyday
- Best
- Max DPI
HP real-life digital photography or HP real-life technologies
- To provide the best quality digital photos, choose the editing level. It will improve digital photos with exposure issues, resolution, dark areas, or washed-out colors.
- You can change the HP Real Life settings from the Advanced Options. Features, Advanced, or Paper/Quality tab can help you to adjust the HP Real Life settings. Alternatively, you can press the Printing Shortcut tab to access such options.
Advanced color settings
- Access the Color tab to adjust tone, brightness, and saturation.
- You can set the levels of each color that your printer model uses.
Resolution
- Switch to the Print/Quality or Features tab to view the DPI details based on the print quality settings or printing shortcut you have selected.
- You can also access these settings in the Advanced Options.
Layout and format settings to fix the HP print settings
With layout and format settings, you can determine how your photo or documents are formatted. These settings also help you to change how your documents are laid out on a paper including adding borders, orientation, printing multiple pages on one sheet, and scaling to specific size paper. Some Printing Shortcuts have formatting and layout settings as well.
Landscape or portrait orientation
- Go to the Layout, Finishing, or Features tab.
- Select the Orientation menu to choose the portrait option for vertical points or the Landscape option for horizontal printers.
Add or remove the border
- Access the border settings from the Paper Size or Borderless Printing menu in the Advanced Options.
- If it is supported by the printer mode then leave the white border around the print or photo to the edge of the paper.
Printing on both sides of the paper (Duplex)
- Navigate to the Layout, Finishing, or Features tab.
- From here, you can print both sides of the paper with HP printer automatically or set up your print job to flip the pages manually.
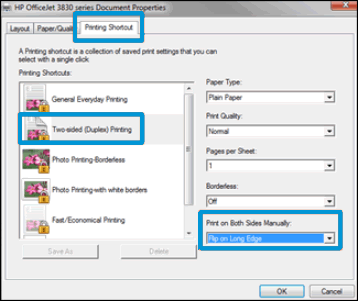
- However, this duplex setting is available in a selected printer model.
Booklet printing
- Go to the Advanced Options or switch to the Finishing or Features tab to select the page flip binding settings for your booklet reading.
Page order
- Select the Basics, Layout, Advanced, or Features tab.
- From here, you can print pages from back to front or vice versa.
Pages per sheet
- This setting is available in the Advanced Options.
- Alternatively, you can switch to the Finishing, Layout, or Features tab.
- At this moment, you can print multiple pages of your document on a sheet of paper.
- You can also choose the order that they are printed on a page.
Resize or scale the printout
- Open the Resizing Options on the Effects or Features tab.
- Then, you can perform the following options depending on your preferences:
- Modify the percentage of the original size of the document that prints.
- Print to fit on the different paper sizes.
- Scale to fit the selected paper size.
Minimize margins
- Go to the Advanced tab.
- Then, print close to the bottom of the page.
Mirror printing
- Move to the Advanced tab.
- From here, you can reverse the document or image to print iron-on transfers.
Poster printing
- Access this setting from the Advanced tab.
- This setting allows you to enlarge the document or image to print iron-on transfers.
Watermarks
- Access watermark settings by clicking on the Edit button from the Effects tab.
- A watermark is an image placed within the document. This image becomes visible when you send it for printout.
- You can print the watermark on each page of a document or only the first page if selected.
Ink and toner handling settings to fix HP print quality
In some HP printer models, you will find the settings that let you change how the toner or ink is applied to a paper. You can also determine how much ink needs to be used and how long a printer should hold the print for drying. Besides, you can control individual colors. These settings can be accessed from the Advanced or Color tab.
Advanced color settings
- From the Color or Advanced tab, you can adjust the brightness, tone, and saturation.
- If required, you can adjust the levels of every individual color that is used by your printer machine.
Dry time
- With this setting, you can shorten or lengthen the time interval between printing multiple photos or pages.
- Remember, the longer dry time offers more time for slow-drying printouts. Depending on the time you have set, the printer will hold onto the printout until the dry time passes by.
Ink volume
- You can adjust the amount of ink that prints on a page.
- Remember, the lighter ink volume will dry fast.
Overspray
- Sometimes the part of the image cuts off that is printed on the borderless photo. With the overspray option, you can control how much the original image should extend past the edge of the paper.
Save preferred HP printer settings on Windows
HP printer also enables you to save the HP printer settings as default for all the print jobs or as a shortcut for similar print jobs.
Create a custom shortcut
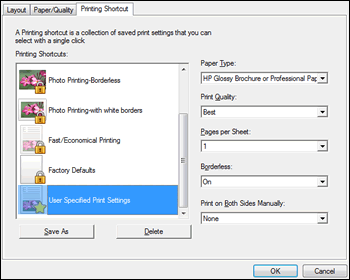
- From the Print Settings window, go to the Printing Shortcut tab.
- Then, click on the User Specified Print Settings shortcut located at the bottom.
- From here, you can modify the print settings.
- After that, press the Save As button to name the shortcut.
Set defaults for all print jobs
- Search for Printers through the Windows search bar.
- Select the Printers and Scanners option.
- Click on your printer model.
- After this, select the Manage button.
- Then, click on the Printer Properties option.
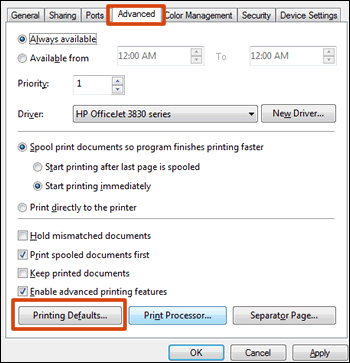
- Switch to the Advanced tab.
- Press the Printing Defaults option.
- Here, you can make the changes and press the OK button.
Note that the print menu locations and settings may vary depending on the printer model, driver type, and app you use for printouts.
To wind up on how to change print settings on HP printer
The printer provides lower to higher-quality prints. Depending upon your needs, you can change print settings on HP printer for Windows and adjust the quality of paper, ink levels, speed, and effects for the printout. By using different options for settings, you can get the printouts as per your choice.

