With a variety of options, the HP printer lets you perform multiple duties such as scanning, printing, and more. In addition, scanners can read 2D images, i.e., drawings or photographs. After scanning the document or photo, you can directly send it to another folder or computer. If you are willing to know how to scan from HP printer to Mac and Windows computer or laptop, this guide will enlighten you.
Learn how to scan from HP printer to Windows & Mac computers
To scan with HP printer on Mac and Windows, you are required to install the HP Smart app for Mac. This app holds smart features that will help you to perform multiple tasks. After installing the app on your computer, you can use the camera of your system or set up the scan jobs from your printer. Learn more about how to scan from HP printer to Mac and Windows computers.
Please Note: To access the printer functions, you need to log in to the HP account. In case the HP Smart application does not work, you can use the HP Easy Start by downloading it on your PC.
Step 1: Install HP Smart app to scan with printer on Mac and Windows
The first step is to download and install the HP Smart app so you can set up your HP printer. This app can be installed on your Windows or Mac computer.
If you need to connect your HP printer to the WiFi network, the following are the steps you are supposed to follow:
- Place your computer and printer near your WiFi router.
- Enable WiFi on the computer and then get connected to the network. In case your PC is connected to the internet via an Ethernet cable, disconnect it temporarily and use the WiFi instead (during the setup).
- Turn on Bluetooth on your PC. This will enable the HP Smart app to detect your printer while you set it up.
After getting connected to the WiFi network, you can continue setting up the printer through the HP Smart app.
- Download and install the HP Smart app on your computer. Make sure the VPN is disconnected before you download the app.
- Windows users can download the app from Microsoft Store.
- Mac users can download HP Smart from the Mac App Store.
- Once the app is downloaded and installed, you can create your account for HP. If you are already an existing user then you can enter your login details for your HP account.
- After logging in, go to the Add Printer or (+) icon. By doing so, you can search for your HP printer model.
Then, continue following the instructions given on the screen to complete the printer setup through the app. If you are unable to find the printer during the WiFi setup then you can restore the WiFi setup mode on your HP printer. After this, restart your printer again and close the app. Later, you can launch the app and try to add the printer.
Step 2: Use the HP Smart to scan a document from HP printer to Mac and Windows
HP Smart app lets you scan from an HP printer to Mac or Windows computer. Moreover, you can save, send, and share the scanned documents. To access its features on Windows and Mac computers, you can read the following information:
How to scan a document from HP printer to Mac or Windows by using HP Smart App
To scan the photos or documents from your HP printer to Mac or Windows, you can capture the items using the camera of your system. Alternatively, you can perform the scan tools stored on your computer.
- In HP Smart, go to the Scan option from the HP printer on Windows or Mac computers.
- Click on Get Started when the screen displays. Remember the Get Started screen will only appear if you choose the Camera, Scanner, or Import option for the first time.
- From the top, you can use the following options:
- Scanner: Place your original document into ADF (Automatic Document Feeder) or on a scanner glass of your printer. Then, select job type, color, size, & resolution settings. After that, hit the Scan button located on the bottom right.
- Import: Choose photos to apply the boundary. After this, you can use the import settings to modify, print, & share.
- Camera: For this, you can use the webcam to click photos. Then, edit, print, and share the document or photo.
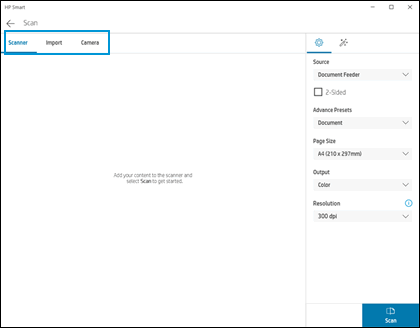
- Modify the settings in the Scan window. It includes presets for photos or documents, source, scan or page size area, resolution, and output type.
- Switch to Auto Enhancements. This will toggle the feature on or off.
- Auto Enhancements: This feature brightens up colors. This also sharpens the image contrast automatically.
- Auto Orientation: It automatically fixes the image orientation.
- Hit the Scan button. This will also show the preview.
- When the Detect Edges screen displays, click and drag the blue dots to fix the boundaries.
- Press the Apply button.
- In the Preview screen, choose any of the following settings and options:
- Click +Add to add the page.
- Drag & drop the image so you can reorder the multiple-page scans.
- Hit the Menu option to edit, replace, & delete the items.
- Rotate the item by clicking on the Rotate icon.
- From the Edit screen, enhance or adjust the file by rotating, changing its color, cropping, adding text, markup, and filters.
- Then, select Done.

- After that, choose options such as Print, Save, Share, Shortcuts, and Fax depending on what is your requirements.
- Once done, you can modify the file type, compression settings, and file name.
- Hit the Save button.
- Select OK after saving your scan.
- Click Back to return to the Homepage, to scan another document from HP printer to Mac or Windows.
Save the scanned document (Single/ Multi-page PDF) on Windows and Mac
To create the PDF of your scanned document, you can use an HP Smart app. For detailed instructions, go through the following details:
- Select the Scan option.
- Click on Get Started when the screen displays. Remember the Get Started screen will only appear if you choose the Camera, Scanner, or Import option for the first time.
- Now, you can use the following options:
- Scanner: Place your original document into ADF (Automatic Document Feeder) or on a scanner glass of your printer. Then, select job type, color, size, & resolution settings. After that, hit the Scan button located on the bottom right.
- Import: Choose photos to apply the boundary. After this, you can use the import settings to modify, print, & share.
- Camera: For this, you can use the webcam to click photos. Then, edit, print, and share the document or photo.
- After that, click and drag the blue dots to fix the boundaries.
- Press the Apply button.
- In the Preview screen, click +Add for multiple-page documents.
- Then, place the next page on the scanner or use the camera. Repeat the same until you scan all the pages.
- Now, select Save or Share in the Preview screen.
- After this, you can modify the file name. Also, make sure you click Basic PDF as a file type.
- Press the Save button. This will save a PDF to the folder stored on your computer. You can also share the scanned documents from HP printers via email.
Send the scanned document to Email on Windows and Mac Computer
If preferred, you can send your scanned documents or photos from HP printers through email. To adjust the email settings, you can follow these steps:
- Start with setting up the email account with the Mail app installed on your computer.
- Windows: Launch the Mail app, select Settings, and click on the Manage Accounts add account. Choose the service provider and type the email address & password to finish the setup.
- Mac: Access the Mail app and select the MailAdd Account option. Then, type the email ID and password to finish the setup.
- Select the Scan option.
- Now, you can use the following options:
- Scanner: Place your original document into ADF (Automatic Document Feeder) or on a scanner glass of your printer. Then, select job type, color, size, & resolution settings. After that, hit the Scan button located on the bottom right.
- Import: Choose photos to apply the boundary. After this, you can use the import settings to modify, print, & share.
- Camera: For this, you can use the webcam to click photos. Then, edit, print, and share the document or photo.
- After that, adjust the boundaries by using the dots of the captured or imported item.
- Press the Apply button.
- In the Preview screen, click Share, and modify the file type, file name & compression.
- Then, hit the Share button.
- Click the Mail option. Here, you will see the email message with the file attached.
- In the To section, type the email address.
- Hit the Send button to send the scanned document from the HP printer.
Conclusion
HP Smart app makes it convenient for you to send print jobs or scan documents from HP printer to Mac or Windows computers. By connecting your printer to the HP Smart, you can scan documents or photos by using the system’s camera. If required, you can adjust the settings, and then save or send them to the concerned user. We hope you have now learned how to scan a document from HP printer to Mac or Windows Computer.
Frequently asked questions
- Is there any other app and tool available for scanning
- How to scan from the HP printer control panel
- How to save a scan as an editable text file
- Why am I not able to connect my wireless printer or scan over a network