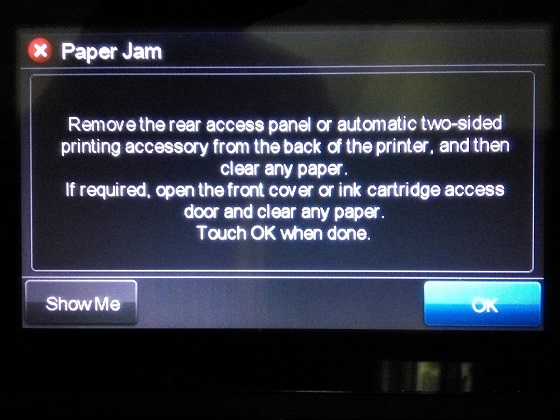
If you are looking for a solution to fix the HP Printer paper jam error but no paper jam, then you are reading the best article. The printer control panel displays a ‘Clear jam’ message. There are several causes behind the paper jam error, you can find the appropriate solutions listed below.
What are the reasons behind the HP Printer keeps jamming problem
You may face with HP printer keeps jamming for various reasons. But sometimes you encounter HP Printer paper jam error but no paper jam in actual (false jam).
HP printer ink system failure error is a common problem that puzzles users as it seems like an HP printer jam. So, we have valid reasons behind the paper jamming problem on printers here.
- Not regular servicing of a printer causes the error of the printer keeps jamming.
- Moreover, an outdated driver or its compatibility issue may cause the paper to keep jamming problems in HP Printers.
- The USB cord is not plugging correctly.
- Consequently, you might face that power light blinking fast over the control panel. This is an indication that paper might be jammed inside the printer.
- HP incompatible ink cartridge and its wrong placement also led to this problem.
You might face a HP printer paper jam error but no paper jam is actually called a false printer jam. So, avail of the solutions below to fix the issue.
Solutions to fix HP printer paper jam error but no paper jam
If you are unable to locate jams in one area then continue to the next solution. Remember paper jams can be real or false. Our solutions run for both the real and false printer keeps jamming issues.
Download HP print and scan doctor to resolve the false paper jamming problem
- Firstly, download the print and scan doctor tool from the official website of HP.
- Post-download run and install the ‘HPPSD-exe’ file from the downloads folder.
- Next, you need to open the automated tool and click on Start.
- Next, you have to select your printer from the list of available printing devices.
- If you are unable to locate your printer then restart it once and try again.
- If there is any connectivity issue, then follow the guide from the tool to continue.
- Lastly, you will have two options fix printing and fix scanning. You need to continue by choosing fix printing to resolve the false jamming error.
Solution 1: Remove the jammed paper from the input tray
- Turn on the printer by pressing the power button.
- From the rear side of the printer eject the power cord. Make sure the printer is still ON.
- Then, locate the input tray on the backside of the printer.
- Gently pull out the jammed paper from the input tray to fix the issue.
- Inspect the Input tray and look for any unwanted object if any to remove it.
- Regain the printer to its normal state.
- Now you need to reconnect the power cable to the rear end of the printer and then start the printer.
- Finally, try to print any document. If the problem remains there then try the next solution.
Warning: Always try to resolve HP printer paper jam errors through the rear side of the printer. Because if you try this from the front side then it may destroy the print mechanism.
Solution 2: Removed jammed paper from the output tray
- Eject the power cable and make sure that the printer is turned off.
- To resolve the paper jamming pull out the paper smoothly from the output tray.
- Gently remove the jammed paper and its bits torn from the tray.
- Ensure using both hands while pulling the paper from the tray to avoid tearing.
- Finally, try to print. If the problem persists then try the next solution.
Solution 3: Removed jammed paper from the rear side of the printer
- Firstly, press the power button to Turn ON the printer.
- “Printer is ON” Now disconnect the power cable from the backside of the printer.
- Turn to the rear side of the printer. Then, move the rear access door to the right and pull it on your side.
2] Pull the rear access door toward you
- Smoothly lift any jammed paper or bits of torn paper from the rollers inside the printer. You must use both hands to pull papers to avoid tearing.
- Make sure you remove all the torn pieces from the rollers and their wheels if any.
- Reinstall the rear access door.
2] Push the rear door into the printer
- Connect the power cable to the backside of the printer. and Turn it ON.
- Test printing, if the problem persists then check for jammed paper in another area.
Solution 4: Remove the jammed paper from the ink cartridge area
- Firstly turn OFF the printer and then eject the power cable from the printer.
- To open the Ink cartridge access door put your fingers on the slot at the left side of the printer and then pull it outwards.
- Clear if there is any jammed paper in the carriage path with both hands. Make sure you pull the paper slowly but steadily towards you to eject it.
- Now run the carriage to the left side of the printer if it is not barred.
- Again remove if any jammed paper is found. Use both hands smartly to avoid paper tearing.
- Remove every torn piece of paper from the printer with the help of a flashlight. Because if torn pieces remain there then more HP printer paper jam likely to occur.
- Move the carriage to its original position to the right side of the printer.
- Now close the cartridge access door.
- Connect the power cable to the rear end of the printer and then turn it ON.
- Test printing, if the problem persists then check for jammed paper in another area.
Solution 5: Remove paper jamming from automatic document reader
- First of all, turn OFF the printer then detach the power cable.
- Eliminate any originals from the document feeder tray.
- Raise the case of the ADF until it quits.

- Examine for any paper jamming at the rear end of ADF.
- Carefully eject the jammed paper from the ADF with both hands. Pull the paper slowly and steadily upwards to remove it.
- Lift the tab positioned at the front end of the ADF to raise the ADF mechanism.
- Now smoothly take any jammed paper in the ADF mechanism. Pull out the paper slowly and steadily upwards to remove it.
- Close the ADF case.
- Finally, connect the power cable to the rear end of the printer and then turn it ON.
Solution 6: Ensure that the carriage can move freely
Make sure that the carriage can move freely throughout the width of the printer.
- Firstly, turn ON your HP printer if it is not already ON.
- Now unlock the ink cartridge access door.
- Wait for the carriage to achieve the idle state and silence before you continue.
- While the printer is turned ON, disconnect the power cable from the rear end of the printer.
- Remove any paper or objects that stop the movement of the carriage, and use the flashlight for examining.
- Reach to the printer carriage via ink cartridge access door then manually move the carriage.
- Move the carriage to the right side of the printer if it gets stuck to the left side.
- You are supposed to move the carriage to the left side of the printer if it gets stuck to the right side.
- Move the carriage to the right side of the printer if it got stuck in the middle of the printer.
- Remove any barrier or waste paper from it.
- Make sure the free movement of the carriage is throughout the width of the printer.
- Now shut the ink cartridge access door.
- Finally, connect the power cable to the rear end of the printer then turn it ON.
- Now try printing any document if the printer keeps on jamming then follow the steps from the next solutions.
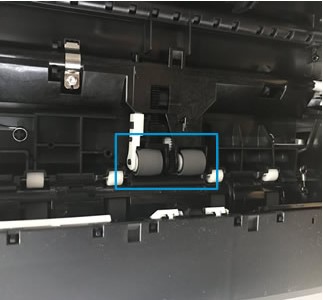
Solution 7: Clean the paper feed rollers to solve HP printer paper jam error
Paper fibers, dust, and other trash might be collected on paper feed rollers which can cause paper jam and paper feed issues. Clean the printer rollers and then try to print any document.
- Turn off your printer and then eject the power cord from the rear end.
- Open the input tray.
- Inside the input tray find out the gray paper pick rollers. Then clean it fully with a moist cloth to eliminate dust or dirt buildup.
- Before placing the rollers back in their position after cleaning make sure that it is dry completely.
- Make the connection of the power cable with the rear side of the printer. Now turn it ON.
- Lastly, again try to print any document.
Solution 8: Clean the printer rollers to fix printer keeps jamming error
- Eject all papers from the input tray of the printer.
- Now you need to click on the down arrow sign button to select Settings and then press OK.
- Again click on the down arrow button to select Tools and then press OK.
- Finally, click on the down arrow button to select Clean Paper Feed and then press OK. Now the printer will make noise for around a minute.
- At the moment you have to wait until the printer stops completely before you continue.
- Now again try to print any document. If the problem persists then try the final solution listed below.
Solution 9: Reset your HP printer to fix paper jam error
Sometimes there is a false paper jam error even no jammed paper at all. You might remove this problem just by resetting your printer.
- Turn ON your printer and then eject the power cord from the rear end.
- Then Disconnect the power cord from the power socket.
- Now you have to wait for one minute.
- Reconnect the power cable to the socket and then to the rear end of the printer.
- Lastly, Turn ON the printer and try to print any document to check whether the issue is resolved or not.
Solution 10: The printer needs service
Most probably users can resolve the HP printer jam error with the help of the above solutions. HP printer needs service if the issue continues after performing the above solutions. You may also replace your HP Product. You can check your product warranty status from the HP product warranty check page.