HP Printer Assistant is a printing software used to set up the printer, check ink levels, scan, order supplies, and more. Although the software works efficiently, it may bump into technical glitches. Many users encounter the HP printer assistant not working error message which is caused by Windows system updates.
As you update your Windows system, it removes all the printer details in Windows and HP printer assistant. As a result, you receive a prompt to connect to a new printer on the printer assistant window. If you are also facing an HP printer assistant not working issue, fix this by implementing the most effective solutions shared below.
How to fix HP printer assistant not working or missing error?
By restarting your Windows system and HP printer, you can make your printer assistant work again. If the HP printer assistant not working error message is still showing up, you can try reconnecting your printer and reinstalling the printer driver. If required, you can also use the Windows built-in print driver to send your documents for printing. Find the list of helpful methods with detailed instructions:
Fix 1: Restart your printer and computer if the HP printer assistant not working
Windows OS or printer may have a technical glitch. HP printer assistant not working is one of the common error messages caused by such bugs. These may prevent the opening of HP printer assistant software and functioning properly on Windows computers. However, by restarting both devices, you can fix the problem.
- Power off your HP printer.
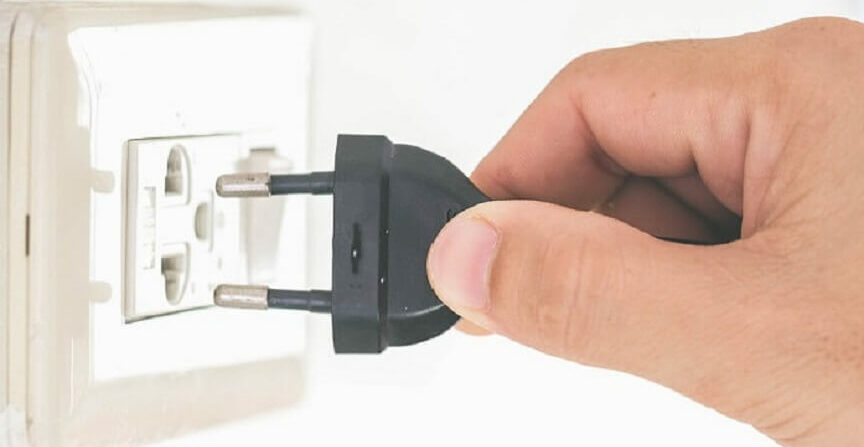
- Restart the Windows computer.
- Now, Power on your printer.
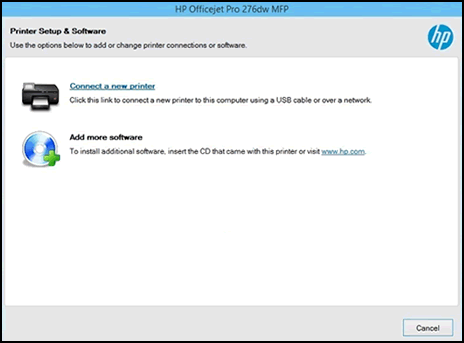
- Open the HP Printer Assistant software. If it opens properly, this indicates the problem is fixed. However, if it does not then you will see the Printer Setup and Software screen Here, you can click on the Connect a new printer and continue following the instructions on your screen.
Once you execute these steps, you can restart your Windows computer and HP printer to finish the installation. If you are still facing issues accessing HP printer assistant, you can reconnect your HP printer.
Fix 2: Reconnect the HP printer to avoid assistant missing error
If the HP printer assistant not working or a missing error occurs and prompts you to connect to a new printer, don’t worry. You can resolve this problem by reconnecting your HP printer. By doing so, you will again have access to the HP printer assistant tools.
While you connect a new printer, you must select your connection type, and pursue the on-screen prompts to set up your printer. Later, you can restart your printer and Windows PC.
- Click on the Connect a new printer.
- When prompted, select your Connection Type.
- Then, follow the instructions displayed on your screen to finish setting up the printer.
Note: In case you find a Red Cross (X) and your connection fails, you can click Retry and continue following other steps.
- Power off your printer.
- Restart the Windows computer.
- Now, Power on your printer.
- Launch HP Printer Assistant software.
The issue resolves successfully if the HP printer assistant software opens. However, if it does not open or the connection seems to fail, try another troubleshooting fix.
Fix 3: Remove printer software if the HP printer assistant not working
HP printer software often creates conflicts if it contains unexpected bugs. This may result in the HP printer assistant not working error message. If that happens to you, try uninstalling the printer software and driver. Later, you can reinstall the latest driver to avoid errors.
- Remove USB cables from your printer.
- Then, search for the Control Panel on a Windows computer.
- Go to the Programs and Features section.
- When you see the list of programs, click on the name of your printer.
- Click the Uninstall button.
After that, you can pursue the instructions given on your screen to finish the removal process. Later, you can restart your computer and continue reinstalling the latest driver to successfully access the HP printer assistant.
Fix 4: Reinstall the latest printer driver
Once you remove the HP printer software and driver. Next, you need to download and install the HP printer firmware update. If required, you can use an installation CD if it has the driver for the Windows version. Learn how to reinstall the HP software with drivers.
- Power on your HP printer.
- Remove the USB cable from your printer. You will get a prompt if the cables are necessary during the software installation.
- Now, visit the official HP website to download the full-feature software with the latest version.
- If it prompts you to identify your product, you can choose Printer.
- Then, type the printer model number and select Submit.
- Select the Change button in case you want to change your operating system for installation.
- After selecting your version, click the Change button.
- Go to the Driver section and select Download. You may also click on the Basic Drivers option for other driver options.
As you perform these steps, the full software package starts downloading on the selected operating system. Once the printer software is successfully downloaded, you can access the HP printer assistant.
Fix 5: Use the Windows built-in print driver if HP printer assistant not working
Windows computer comes with a print driver pre-installed in the system. Using the built-in printer drivers, you can set up the printer and easily perform printing jobs. You can do this in two different ways; using the network printer and a USB-connected printer on Windows.
Adding a network printer to Windows
Be it WiFi or wired network, you will have to add a network printer in Windows. This does not require you to install additional drivers.
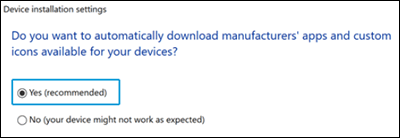
- On Windows, search for Change device installation settings.
- Once the settings open, ensure the Yes (recommended) option is selected.
- Then, place your computer and printer near your WiFi router.
- Make sure you connect your printer and computer to the same network.
- After that, search for the Add a printer or scanner option on Windows.
- Select the Add a printer or scanner option and wait for your system to find the available printers.
- If your system finds the printer, click on the Add device option to finish the driver installation process.
- In case, the printer is not found then you can continue with the following steps.
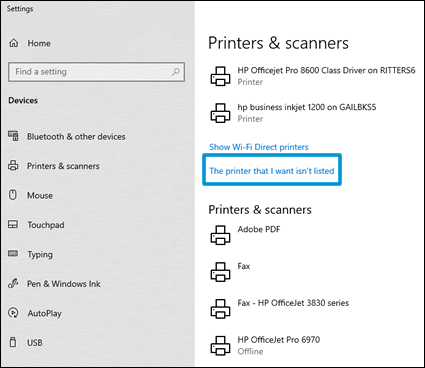
- Select The printer that I want isn’t listed.
- When you get into the Find a printer by other options screen, click the Add a printer using TCP/IP address or hostname.
- Click the Next button.
- Using the Device Type drop-down menu, click the Autodetect option.
- Search the IP address of your printer.
- Enter the IP address of your printer.
- Click the Next button.
- Follow the instructions given on your screen to complete the driver installation process.
Adding a USB-connected printer to Windows if HP printer assistant not working
You can also set up a printer on Windows without installing the additional drivers. This process requires you to use a USB.
- Search for Change device installation settings on Windows.
- Once the settings open, ensure the Yes (recommended) option is selected.
- Make sure the open USB port is available on your PC. Also, note that you don’t need to connect your printer to the docking station or USB hub as your printer might not receive power to properly operate.
- Now, power on your printer.
- After that, connect your USB cable to the computer port and printer.
- If you see Found new hardware message then follow the prompts to install the printer.
- If you are able to print properly, it indicates the driver has been installed. If the printer is not found, do the following:
- Select The printer that I want isn’t listed.
- When you get into the Find a printer by other options screen, click the Add a local printer or network printer with manual settings.
- Click the Next button.
- From the Choose a printer port screen, choose User an existing port and click USB001: (Virtual printer port for USB) using the drop-down option.
- Click the Next button.
Later, you can follow your screen’s instructions to finish the driver installation for your printer model.
Conclusion on HP printer assistant not working
It is common to encounter errors when using the HP printer with Windows. If your HP printer assistant is not working after updating Windows OS, you can troubleshoot your printer and computer to resolve the issue.
Frequently asked questions
- What if the HP printer cannot connect to the network
- What if my HP printer is not found or the wired network connection fails
- How to use the printer functions with the Windows built-in driver
- How can I change the printer settings if using a built-in driver
- What if my HP printer is not found or the connection fails during USB setup