When you download printer software on a Windows 10 computer (version 1803 or later), you may encounter an error that reads Extraction Failed Cannot delete output file error. Due to the presence of this error, the downloaded software fails to open and install. However, you can complete the printer setup by opening the software manually.
Recommendation: Connect with a technician through live chat because they understand the various causes behind this error very precisely and provide you with the most appropriate solution to fix it.
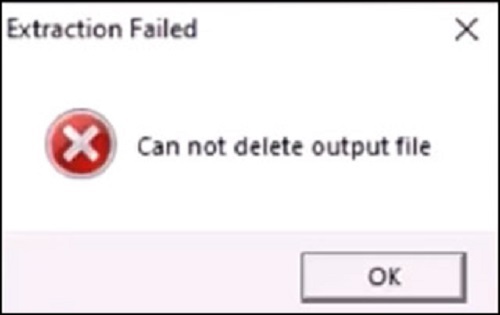
This guide will explain how to fix the cannot delete output file error for HP LaserJet Pro M12, M1210, M1130, P1100, P1600, P1560, and other printers.
Fix Extraction failed on HP LaserJet Pro M12, M1210, M1130, P1100, P1600, P1560 printers
To open your installed software manually, you can use the Windows Run Program. From there, you can locate the file path based on the printer model number. Then, install the file to finish the printer setup and fix the cannot delete output file HP printer.
- Click right on the Start menu on your Windows computer.
- Then, click on the Run option.
- When the Run dialog window displays, type any of the following file paths for the printer:
- HP LaserJet Pro P1100, P1600, and P1560 printers: C:\LJP1100_P1560_P1600_Full_Solution\HpSetup.exe
- HP LaserJet Pro M12 printers: C:\LJPM11-M13_Full_Solution\HpSetup.exe
- HP LaserJet Pro M1130, M1210 Multifunction printers: C:\M1130MFP_M1210MFP_Full_Solution\HpSetup.exe
- Select the OK button.
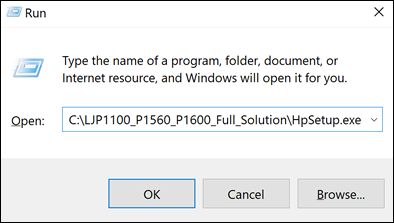
As you perform these steps, it proceeds with the installation. Thereafter, you can continue following the on-screen instructions to complete the printer setup.
Fix Extraction failed- cannot delete output file for all other HP printers
If you have some other printer model, you can still locate the installation file from the hard drive. In case you don’t find the file then open the %temp% folder to access the most recent folder and run it as an administrator.
- Search for This PC on your computer.
- Then, open the hard drive, for example, Windows (C:).
- Now, locate the name of your printer.
- If the name of your printer displays then you need to open your folder, click right on the setup.exe file, and pursue the prompts.
- If the name of your printer does not display then continue following these steps.
- Use the Windows search bar and search for %temp%.

- When the %temp% folder displays, open it and search for 7z.
- Then, open the folder for the printer. If you have more than one 7z folder, you can sort them by date so you can access the latest folder from the list.

- Once found, click right on the setup.exe file.
- After that, select Run as administrator to proceed with the installation.
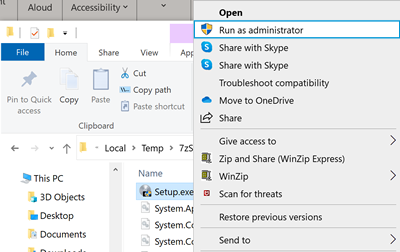
Now, you can continue following the instructions given on your screen and complete the printer setup. This will no longer display extraction failed- cannot delete output file error
Final verdict
If your HP printer software is downloaded but unable to complete the installation, you may end up seeing an Extraction Failed Cannot delete output file error. To finish the printer setup, you can locate the setup file and install it manually.

