There can be instances when your printer fails to register. This might trigger an error message stating Unable to Register the Printer to Your Account. You might also encounter error code OW_4XX_OWSWS00001 or UA_200_OWSVD00001 in the HP Easy Start or HP Smart app.
Due to the presence of this error, your HP printer cannot connect to web services. As an outcome, you cannot use your printer properly. To avoid such an issue, complete the printer setup so you can successfully register your printer to the account.
Recommendation: Connect with a technical expert via live chat to avail of the most appropriate solution because they understand the causes behind this error very precisely.

7 Effective methods to remove ‘Unable to register the printer to your account’ with error code ow_4xx_owsws00001 or ua_200_owsvd00001
To complete the printer setup procedure, one has to perform basic troubleshooting methods. For instance, restarting the printer, checking the internet connectivity, and setting up the printer hardware.
Apart from this, you can update the printer firmware and restore factory defaults on the printer. You may also disconnect your HP printer from the HP Smart app and set it up again. These repair methods will you to resolve the registration errors and HP error code ow_4xx_owsws00001 or ua_200_owsvd00001.
Fix 1: Restart your HP printer to fix error code ow_4xx_owsws00001
Unable to Register the Printer to Your Account or HP error code OW_4XX_OWSWS00001 or UA_200_OWSVD00001 can be resolved if you restart your printer as well as the software. Go through the following steps to understand better:
- Make sure your HP Smart app is closed.
- Now, power off the printer and restart it.

- Wait for 2-3 minutes so that your printer can get connected to a wireless network.
- Launch the HP Smart app and select the Finish Set Up button.
After restarting the HP Smart app and the printer, you can check if the error code ow_4xx_owsws00001 or ua_200_owsvd00001 or the “Unable to Register the Printer to Your Account” message has disappeared. If not, you need some more solutions.
Fix 2: Check if the printer has an active internet connectivity
When your printer does not have strong internet connectivity, you might encounter an error “Unable to Register the Printer to Your Account“. Also, you may face HP error code ow_4xx_owsws00001 or ua_200_owsvd00001. Therefore, it is necessary to make sure that your printer has an active internet connection.
To check this, the following are the steps that can be pursued:
- Go to the Control Panel of your printer.
- Spot the Wireless icon.
- If you see the solid blue light on the Wireless icon, it indicates that your printer already has the network. In this case, you can directly jump to the next fix.
- But, if you find the light blinking then you need to connect the printer again to the wireless network. Make sure you place your printer within a good range to your WiFi router and reconnect it.
Now that you have checked the status of internet connectivity, you can continue to connect your printer to the network. Following are the steps that can be used for the HP printers with or without a touchscreen.
HP printer (with touchscreen panel)
If you are using an HP printer with a touchscreen, you can easily connect your printer to the network. Let’s find out how:
- Go to the Control Panel of your printer and tap the Home icon.
- If you find a message that your printer is being set up by HP software then you can tap on the “?” icon.
- Select Exit. This will open the Firmware Update window.
- Tap Next.
- Choose your preferences.
- Select Save.
- When the Home screen opens, you can access the Wireless, Setup, or Network Settings menu.
- Choose Wireless Setup Wizard and continue following the instructions given on your screen.
- As you are done following these steps, pick the name of the network and type the password to get connected.
HP printer (without a touchscreen panel)
Those who use HP printers without a touchscreen may find it a little tricky to connect their printer to the network. Moreover, the steps to reset WiFi may vary for different printer series. You can follow the steps based on the printer series you have.
HP LaserJet M109e-M112e printers
- In case the Ready light is dull or the Control Panel is blank, press Resume or Cancel. This will exit the Sleep Mode.
- Then, press the Wireless option until the Attention light starts blinking.
- At this moment, you need to wait for 1 minute until you see the Wireless light blinking.
HP LaserJet MFP M232e-M237e, M207e-M212e printers
- If you see the Control Panel with a blank screen, press Cancel. This will exit the Sleep Mode.
- Now, press the Information icon for about 5 seconds. You will notice all the Control Panel buttons have lightened up.
- Here, you need to press down the Wireless as well as the Cancel buttons together and release them later.
- Thereafter, you will either see the Wireless icon on your Control Panel or the status light on your printer’s front.
For HP Envy 6400e, 6000E printers
- Press down the WiFi Reset button for about 5 seconds and release it later.
- Now, go to the error screen and select Exit Setup.
- Then, remove the printer from your HP Smart app.
- For Mac and Windows, click right on the printer’s name and select Hide.
- For iOS and Android, tap and hold on the printer’s name and select Hide.
- Select Add Printer.
- After this, you can wait for the app to detect your printer. Then, select Set Up to connect to a wireless network.
HP LaserJet M139e, M139, M142e, M142 printers
- If the Ready light is dull or the Control Panel is blank, press Cancel to exit the Sleep Mode.
- Then, press the Wireless & Cancel buttons for about 5 seconds.
HP DeskJet 4200e, 2700e printers
- On the Control Panel of your printer, select the Cancel button.
- Now, use the Wireless & Cancel buttons together for about 5 seconds until you see the Power button blinking.
- Then, you can wait until the Wireless light turns blue.
With the proper network connectivity, your printer will work effectively. If you are still facing “unable to register the printer to your account” then try other fixation methods.
Fix 3: Setting up HP printer hardware to fix register error code OW_4XX_OWSWS00001 or UA_200_OWSVD00001
It is really important to ensure that your printer hardware is properly set up. All the packing materials should be removed. Also, the printer should be turned on. Let us help you with the basic steps to set up the printer hardware:
- Access the printer doors, and pull out the packing material and tape from inside your printer and carriage area. Those who are using HP ENVY Inspire 7900 or 7200 can detach the added cardboard between the tape and paper trays. Don’t forget to shut the paper tray doors.
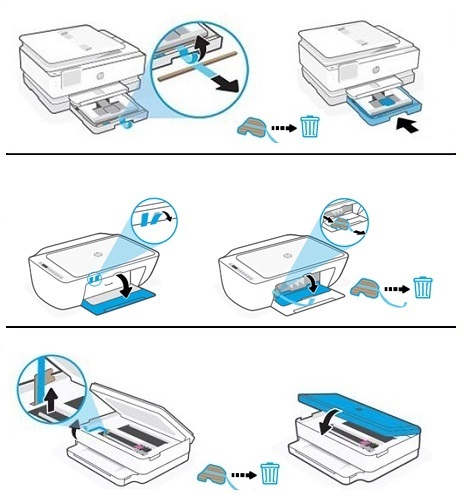
- After closing the printer doors, use the Power button.
- Now, return to the window that is showing the error message and press the Try Again button.
Once your printer hardware setup is done, you can continue using your printer for prints. If any HP error code ow_4xx_owsws00001 or ua_200_owsvd00001 persists, continue with other methods.
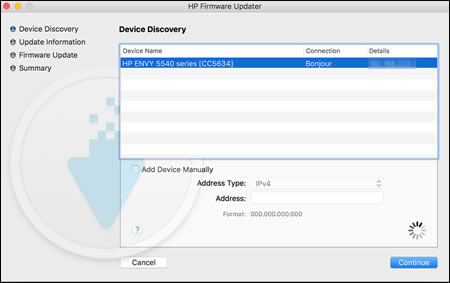
Fix 4: Updating the HP printer firmware to fix error code ow_4xx_owsws00001
If you have pending updates for the printer firmware, you should download drivers and install them immediately to avoid HP error code ow_4xx_owsws00001 or ua_200_owsvd00001. HP printer firmware update can be done through both the touchscreen printer and the HP Smart app.
Updating firmware from your touchscreen printer
First, you have to be sure that your printer has an active internet connection. Also, it should be an Ethernet or wireless connection; USB won’t work here.
- Navigate to the Control Panel of your printer and select the Home icon.
- If you find a message that your printer is being set up by HP software then you can tap on the “?” icon.
- Tap on Exit.
- When you see the Firmware Update window, select Next.
- Choose your preferences.
- Select Save.
- When the Home screen displays, you can go to Setup, Service, and Settings.
- Select Preferences, Printer Maintenance, and Tools.
- Tap on Web Services, Printer Update, and LaserJet Update.
- Follow the on-screen prompts and enable the Web Services on HP printer.
- Choose the Check for Updates button.
Updating firmware from HP Smart app
- Get the HP Smart app.
- Create a new account or sign in to the existing one.
- Now, choose the name or image of your printer.
- From the Advanced section, open Advanced Settings. Or, select Printer Home Page (EWS).
- Open Web Services or Tools.
- Type your printer admin PIN or password if required.
- Select Product Update or Printer Updates.
- Then, select Check Now.
By following these steps, you can easily download and install the firmware updates on your printer. Remember, updating firmware prevents your printer from unwanted errors. So, the next time you get the new updates, install them immediately to avoid inconveniences.
Important Note: It is not recommended to power off your printer during the printer firmware update. Doing so will damage the printer.
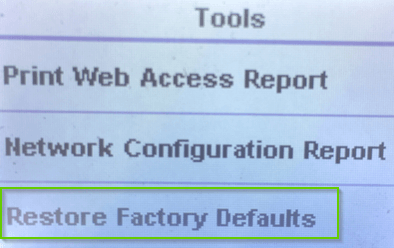
Fix 5: Restoring factory defaults on printer to fix HP error code OW_4XX_OWSWS00001 or UA_200_OWSVD00001
You might have applied some settings for your printer before. By resetting the default printer settings & preferences, you can get rid of the Unable to Register the Printer to Your Account. Moreover, you can fix HP error code ow_4xx_owsws00001 or ua_200_owsvd00001.
The procedure of restoring the settings may be slightly different for touchscreen and non-touchscreen printers. For instance, in a touchscreen printer, you can restore wifi setup mode on HP printer from the Settings menu.
While the non-touchscreen HP printers require you to restore factory defaults from EWS (Embedded Web Server).
For detailed information, you can follow these instructions for touch or without touchscreen HP printers:
Restore the settings for the touchscreen HP printer
- Access the Control Panel of your printer.
- Tap on the Settings icon.
- Touch the Printer Maintenance option.
- Select Restore.
- Now, tap on Restore Factory Defaults.
- If prompted, select Continue to finish the task.
Restore the settings for the non-touchscreen HP printer
- Access EWS on your mobile or computer.
- If you are opening EWS through the HP Smart app, select the Advanced Settings menu.
- Those who are accessing EWS through the printer IP address can click on the Information icon. This will print a Printer Information Page or HP printer network configuration page.
- Now, you can search for your IP address through the pages.
- At this moment, you need to enter the HP printer IP address into your internet browser and hit the Enter key.
- Then, add the printer admin password or PIN when prompted. You may find the PIN on the label.
- Now, move to the EWS page and open the System or Settings tab.
- Select the Services or Restore Defaults section.
- Click on the Restore Factory Defaults.
Once done following these steps, you can wait for the process to complete. Thereafter, you can check for HP error code ow_4xx_owsws00001 or ua_200_owsvd00001 and continue using your printer.
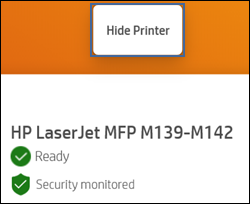
Fix 6: Disconnect your printer from the HP Smart app
Hiding your printer from your HP Smart app might help you remove the Unable to Register the Printer to Your Account error message. All you are required to do is follow these steps:
- Close your HP Smart app and reopen it.
- Then, click right on the Printer icon and select Hide Printer.
When you remove your printer from this app, you will no longer see the printer’s name in your app. Thereafter, you can check for any HP error code ow_4xx_owsws00001 or ua_200_owsvd00001 during the printer’s setup.
Fix 7: Set up your printer through HP Smart app
Even after implementing the above-mentioned methods, if you are unable to fix the HP error code OW_4XX_OWSWS00001 or UA_200_OWSVD00001, then restart your setup process. This can be done through the HP Smart app.
- Launch the HP Smart app.
- Go to the (+) or Add Printer button to spot your printer.
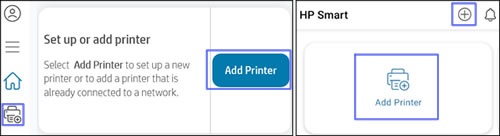
- Then, follow the instructions displayed on your screen.
In case you are not able to finish the setup, you can restart your HP Smart app and try again later.
In conclusion on HP error code ow_4xx_owsws00001 or ua_200_owsvd00001
If you confront the Unable to Register the Printer to Your Account error message or HP error code OW_4XX_OWSWS00001 or UA_200_OWSVD00001. Then you can simply perform the troubleshooting methods we shared above. With the help of these methods, you can complete the printer setup and use your printer effectively.